Showing posts with label Drafting. Show all posts
Showing posts with label Drafting. Show all posts
Monday, July 19, 2010
Drafting Tools
Monday, July 19, 2010
Download in PDF Format HERE:

DRAWING BOARD
 The DRAWING BOARD provides the smooth, flat surface needed for drafting. The tops of many drafting tables are designed for this purpose. Individual drawing boards are manufactured in a variety of sizes. The majority of them are made from selected, seasoned basswood.
The right-handed draftsman will use the left edge of the board as the working edge; the left handed draftsman the right edge. The working edge should be checked periodically for straightness.
Draftsmen often tape a piece of heavy paper or a special vinyl board cover to the working face of the Drafting Board, drawing board to protect its surface. The vinyl surface is easily cleaned.
T-SQUARE

Horizontal lines are drawn with the T-SQUARE, It also supports triangles when they are used to draw vertical and inclined lines.
The T-square consists of two parts, the head and the blade or straight edge. The head is usually fixed solidly to the blade; however, a T-square with a protractor
head and adjustable blade is also available.
Clear plastic strips inserted in the blade edge of some T-squares makes it easier to locate reference points and lines.
The blade must never be used as a guide for a knife or other cutting tool.
If accurate line work is to be done, it is essential that the head of the T-square be held firmly against the working edge of the board.
It is recommended that the blade be left flat on the board or suspended from the hole in its end. This will keep warping or bowing of the blade to a minimum.
TRIANGLES

When supported on the T-square blade, the 30-60 deg. and 45 deg. TRIANGLES, are used to draw vertical and inclined lines. They are made. of transparent plastic and are available in a number of different sizes.
To prevent warping, the triangle should be left flat on the drawing board when not being used.
Angles of 15 and 75 deg. can be drawn by combining the triangles as shown.
To draw vertical lines accurately, rest triangle solidly on the T-square blade while holding the T-square head firmly against the working edge of the drawing board.
COMPASS

In drafting, circles and arcs are drawn with a COMPASS, Bow Compasses For best results the lead should be adjusted so that it is about 1/32 in. shorter than the needle. Both legs will be the same length when the needle penetrates the paper. Fit the compass with lead that Is one grade softer than the pencil used to make the drawing. The lead must be kept sharp.
Several attachments are available for use with the compass.
To set the compass to size, draw a line on a piece of clean scrap paper and measure off the required radius. Set the compass on this line. Avoid setting a compass on a scale. "Sticking" the compass needle into the scale will eventually
destroy its accuracy. You will probably used Large and Small Bow Compass circle template instead of a compass.
DIVIDERS
 Distances are subdivided and measurements are transferred with DIVIDERS. Careful adjustment of the divider points is necessary.
Be careful where you place the dividers or compass after use. It is very painful to
accidentally run the point into your hand.
PENCIL POINTER
 It is not necessary to resharpen your drawing pencil every time it starts to dull.
 It can be repointed quickly with a PENCIL POINTER. Use the pencil sharpener
only when the point becomes very blunt, or when it breaks.
Many commercial pencil pointers are available. The sand paper pad, is most frequently found in the school drafting room. A piece of styrofoam cemented to the back of the pad is used to wipe graphite dust from the freshly pointed pencil.
Keep the pencil pointer clear of the drawing area when repointing your pencil. The graphite dust will smudge your paper when you attempt to wipe it off.
ERASERS

Many shapes and kinds of ERASERS, are manufactured for use in the drafting room. The type of material being drawn upon - paper, film or vellum, will determine the kind of eraser to be used. Brush away eraser crumbs before starting to draw again.
ERASING SHIELD

Small errors or drawing changes can be erased without soiling a large section of the drawing if an ERASING SHIELD is employed. Place an opening In the shield of the proper shape and size over the area to be changed and then erase. The erasure is made without touching other parts of the drawing.
A popular shield is made from stainless steel. This metal can be made very thin and still be strong. It is also wear resistant and does not stain or "smudge" the drawing.
FASTENERS
Three methods of attaching paper to the drawing board are :
Tape is the most desirable of the methods. It does not puncture the paper or the drawing board.
Staples may be used but their continued use will tear up the working surface of the drawing board. They are often difficult to remove.
Thumb tacks are least recommended. They quickly destroy the smooth working surface of the board.
 DUSTING BRUSH
No matter how careful you are, some erasing crumbs and dirt particles will collect on the drawing area. These should be removed by using a DUSTING BRUSH, rather than your hands. Using your hands may cause smudges and
streaks.
Dusting brushes are available in a number of sizes and with natural and man made bristles.
PROTRACTORS

A PROTRACTOR, is used to measure and lay out angles on drawings. They are usually made of clear plastic and may be either circular or semicircular in
shape. The degree graduations are scribed or engraved around the circumference of the protractor.
When measuring or laying out an angle, place the center lines of the protractor at the point of the required angle as shown. Read or mark the angle from the graduations on the circumference of the tool.
FRENCH CURVES

Curved lines that are not exactly circular in form are drawn with a FRENCH CURVE. After the curved line is carefully plotted, it is drawn using a French Curve as shown. The curves are made of transparent acrylic plastic. They
range in size from a few inches to several feet in length and may be purchased individually or as a set.
TEMPLATE
Much time can be saved in drawing standard symbols and figures if TEMPLATES are used.
Made of thin plastic, these tools are available in a large number of styles and sizes.
DRAFTING MEDIA
Drawings are made on many different materials - paper, tracing vellum, film, etc. A heavyweight opaque paper that is white, buff or pale green in color is used in many school drafting rooms.
While this paper takes pencil lines well, it is difficult to erase because the pencil point makes a depression in the paper when a line is drawn. If this material is used, take special care to prevent mistakes.
Industry make much use of vellum and film because reproductions or prints must, be made of all drawings.
Drawing media is available in either sheet or roll form. Standard sheet sizes are identified by letter size:
A - 8 1/2 x 11 or 9 x 12
B - 11 x 17 or 12 x 18
C - 17 x 22 or 18 x 24
D - 22 x 34 or 24 x 36
E - 34 x 44 or 36 x 48
PENCILS
As most drawings are prepared with a pencil, it is important that the proper pencil be selected. The drawing media used will determine the type of pencil that should be used. The conventional graphite lead pencil is satisfactory with most papers and tracing vellums, while a pencil with plastic lead is necessary if the drawing is made on film.
The draftsman can select from 17 grades of pencils that range in hardness from 9H (very hard) to 6B (very soft).
Many draftsmen use a 4H or 5H pencil for layout work and a H or 2H pencil to darken the lines and to letter. In general, use a pencil that will produce a sharp, dense black line because this type of line reproduces best on prints.
 Avoid using a pencil that is too soft. It will wear rapidly, smear easily and soil your drawing. Also, the lines will be "fuzzy" and will not produce usable prints.
A conical shaped pencil point Is preferred for most general purpose drafting. To sharpen the pencil, cut the wood away from the unlettered end. Use a knife or mechanical sharpener and point the lead on a pencil pointer.
 A semiautomatic pencil, is usually preferred to a wood pencil. With this type pencil it is not necessary to cut away the wood to expose the lead. The extended lead is shaped on a pencil pointer.
SCALES
SCALES are in constant use on the drawing board because almost every line on a mechanical drawing must be of a measured length. Accurate drawings require accurate measurements.
Because of the diversity of the work that must be drawn, the scales used by the draftsman are made in many shapes, lengths and measurement graduations. They may be made of wood, plastic, or a combination of both materials. Graduations are printed on inexpensive scales, and are machine-engraved on the more costly ones. For convenience, scales are classified according to their common uses:
ARCHITECTS' SCALE. Each division represents one foot and is divided into twelve parts, each part being equal to one inch.

ENGINEERS' SCALE. Used mostly where large reductions are required. It is divided into 10, 20, 30, 40, 50, 60, 80 and 100 units (each represents one foot) per inch.

MECHANICAL DRAFTSMEN 'S SCALE. Most commonly divided into the following graduations: full size, and 3/4, 1/2, 1/4 and 1/8 in. to 1 foot.

DRAWING BOARD

The right-handed draftsman will use the left edge of the board as the working edge; the left handed draftsman the right edge. The working edge should be checked periodically for straightness.
Draftsmen often tape a piece of heavy paper or a special vinyl board cover to the working face of the Drafting Board, drawing board to protect its surface. The vinyl surface is easily cleaned.
T-SQUARE

Horizontal lines are drawn with the T-SQUARE, It also supports triangles when they are used to draw vertical and inclined lines.
The T-square consists of two parts, the head and the blade or straight edge. The head is usually fixed solidly to the blade; however, a T-square with a protractor
head and adjustable blade is also available.
Clear plastic strips inserted in the blade edge of some T-squares makes it easier to locate reference points and lines.
The blade must never be used as a guide for a knife or other cutting tool.
If accurate line work is to be done, it is essential that the head of the T-square be held firmly against the working edge of the board.
It is recommended that the blade be left flat on the board or suspended from the hole in its end. This will keep warping or bowing of the blade to a minimum.
TRIANGLES

When supported on the T-square blade, the 30-60 deg. and 45 deg. TRIANGLES, are used to draw vertical and inclined lines. They are made. of transparent plastic and are available in a number of different sizes.
To prevent warping, the triangle should be left flat on the drawing board when not being used.
Angles of 15 and 75 deg. can be drawn by combining the triangles as shown.
To draw vertical lines accurately, rest triangle solidly on the T-square blade while holding the T-square head firmly against the working edge of the drawing board.
COMPASS
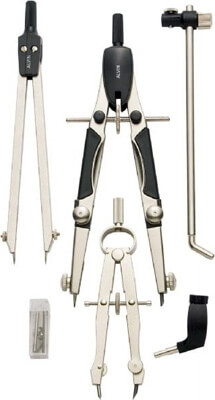
In drafting, circles and arcs are drawn with a COMPASS, Bow Compasses For best results the lead should be adjusted so that it is about 1/32 in. shorter than the needle. Both legs will be the same length when the needle penetrates the paper. Fit the compass with lead that Is one grade softer than the pencil used to make the drawing. The lead must be kept sharp.
Several attachments are available for use with the compass.
To set the compass to size, draw a line on a piece of clean scrap paper and measure off the required radius. Set the compass on this line. Avoid setting a compass on a scale. "Sticking" the compass needle into the scale will eventually
destroy its accuracy. You will probably used Large and Small Bow Compass circle template instead of a compass.
DIVIDERS

Be careful where you place the dividers or compass after use. It is very painful to
accidentally run the point into your hand.
PENCIL POINTER


only when the point becomes very blunt, or when it breaks.
Many commercial pencil pointers are available. The sand paper pad, is most frequently found in the school drafting room. A piece of styrofoam cemented to the back of the pad is used to wipe graphite dust from the freshly pointed pencil.
Keep the pencil pointer clear of the drawing area when repointing your pencil. The graphite dust will smudge your paper when you attempt to wipe it off.
ERASERS

Many shapes and kinds of ERASERS, are manufactured for use in the drafting room. The type of material being drawn upon - paper, film or vellum, will determine the kind of eraser to be used. Brush away eraser crumbs before starting to draw again.
ERASING SHIELD

Small errors or drawing changes can be erased without soiling a large section of the drawing if an ERASING SHIELD is employed. Place an opening In the shield of the proper shape and size over the area to be changed and then erase. The erasure is made without touching other parts of the drawing.
A popular shield is made from stainless steel. This metal can be made very thin and still be strong. It is also wear resistant and does not stain or "smudge" the drawing.
FASTENERS
Three methods of attaching paper to the drawing board are :
Tape is the most desirable of the methods. It does not puncture the paper or the drawing board.
Staples may be used but their continued use will tear up the working surface of the drawing board. They are often difficult to remove.
Thumb tacks are least recommended. They quickly destroy the smooth working surface of the board.

No matter how careful you are, some erasing crumbs and dirt particles will collect on the drawing area. These should be removed by using a DUSTING BRUSH, rather than your hands. Using your hands may cause smudges and
streaks.
Dusting brushes are available in a number of sizes and with natural and man made bristles.
PROTRACTORS

A PROTRACTOR, is used to measure and lay out angles on drawings. They are usually made of clear plastic and may be either circular or semicircular in
shape. The degree graduations are scribed or engraved around the circumference of the protractor.
When measuring or laying out an angle, place the center lines of the protractor at the point of the required angle as shown. Read or mark the angle from the graduations on the circumference of the tool.
FRENCH CURVES

Curved lines that are not exactly circular in form are drawn with a FRENCH CURVE. After the curved line is carefully plotted, it is drawn using a French Curve as shown. The curves are made of transparent acrylic plastic. They
range in size from a few inches to several feet in length and may be purchased individually or as a set.
TEMPLATE
Much time can be saved in drawing standard symbols and figures if TEMPLATES are used.
Made of thin plastic, these tools are available in a large number of styles and sizes.
DRAFTING MEDIA
Drawings are made on many different materials - paper, tracing vellum, film, etc. A heavyweight opaque paper that is white, buff or pale green in color is used in many school drafting rooms.
While this paper takes pencil lines well, it is difficult to erase because the pencil point makes a depression in the paper when a line is drawn. If this material is used, take special care to prevent mistakes.
Industry make much use of vellum and film because reproductions or prints must, be made of all drawings.
Drawing media is available in either sheet or roll form. Standard sheet sizes are identified by letter size:
A - 8 1/2 x 11 or 9 x 12
B - 11 x 17 or 12 x 18
C - 17 x 22 or 18 x 24
D - 22 x 34 or 24 x 36
E - 34 x 44 or 36 x 48
PENCILS
As most drawings are prepared with a pencil, it is important that the proper pencil be selected. The drawing media used will determine the type of pencil that should be used. The conventional graphite lead pencil is satisfactory with most papers and tracing vellums, while a pencil with plastic lead is necessary if the drawing is made on film.
The draftsman can select from 17 grades of pencils that range in hardness from 9H (very hard) to 6B (very soft).
Many draftsmen use a 4H or 5H pencil for layout work and a H or 2H pencil to darken the lines and to letter. In general, use a pencil that will produce a sharp, dense black line because this type of line reproduces best on prints.

A conical shaped pencil point Is preferred for most general purpose drafting. To sharpen the pencil, cut the wood away from the unlettered end. Use a knife or mechanical sharpener and point the lead on a pencil pointer.

SCALES
SCALES are in constant use on the drawing board because almost every line on a mechanical drawing must be of a measured length. Accurate drawings require accurate measurements.
Because of the diversity of the work that must be drawn, the scales used by the draftsman are made in many shapes, lengths and measurement graduations. They may be made of wood, plastic, or a combination of both materials. Graduations are printed on inexpensive scales, and are machine-engraved on the more costly ones. For convenience, scales are classified according to their common uses:
ARCHITECTS' SCALE. Each division represents one foot and is divided into twelve parts, each part being equal to one inch.

ENGINEERS' SCALE. Used mostly where large reductions are required. It is divided into 10, 20, 30, 40, 50, 60, 80 and 100 units (each represents one foot) per inch.

MECHANICAL DRAFTSMEN 'S SCALE. Most commonly divided into the following graduations: full size, and 3/4, 1/2, 1/4 and 1/8 in. to 1 foot.

A Good Drafting Guide
Monday, July 19, 2010
Drafting Review:
Good drafting skills are essential to any drafting projects and are developed with
practice. The three main skills that you need to develop are 1) reading a scale 2) line quality 3) lettering.
Linework and Line Weights
There are three steps you can take to control the line quality:
1) the pressure you put on the lead holder
2) the sharpness of the lead
3) the type of lead
Light/ Thin Lines
Always start your drawings using light “layout” lines using a hard lead such as 3H. These lines should be very light so that when bluelines or copies are made, they will not show up on the plan. Guidelines for lettering should also be very light. Light lines can be achieved by using a finer point mechanical pencil, such as a .3mm .
Lines that are slightly darker, but still light are extension lines, leaders, door swings and break lines. These will be the thinnest visible lines on your copies.
Medium Lines
Used for hidden objects and are usually indicated with dashed lines. Centerlines are usually medium weight as well as object lines (furniture and equipment). Use a 2H and a .5mm lead.
Thick Lines (Darkest)
Typically twice as thick as a light line, these lines are for major elements such as walls and structural members. Items such as fireplaces and stairways also use thick lines. Use a H hardness with a .5mm thickness.
Drafting Tips:
1) Use variety of leads from 3H – H and from .3 - .5 or .7mm. If you only use one lead harness and thickness, you will have a poorly drafted plan.
2) Start with very light layout lines (2H or 3H) and darken in the plan just before you make copies or blue lines. This will prevent smears all over your drawing.
3) Work from top to bottom so that you are not smearing your tools and hand all
over your drawing. You may want to cover up your drawing with trash paper to
protect it from smears.
4) Invest in a good mechanical pencil that has a long tip for working with the
parallel bars. If the tip is too short, your lines will be wavy. Make sure to keep your pencil tip close to the parallel bar.
5) If you have fuzzy lines, you have bad line quality. Your lead may be too soft or
you may be working on a hard surface. Use a vinyl drafting pad on your surface.
Fuzzy lines are also an indicator that you are not rotating your pencil and the lead is not pointed.
6) Keep your pencil at an angle (30 – 60 degrees) from the drawing surface.
7) Pull the lead across the paper. Don’t push the lead into the paper.
Lettering
1) Always use lettering guidelines and keep them VERY light (3H) and thin.
2) Change out your pencil to H or HB for lettering.
3) Use a scale or Ames lettering guide to create the guidelines. You can use a 2-
part or a 3-part line. The top and bottom lines are the boundaries while the middle line provides a guide for letter parts.
4) Spacing between lines should be 1/16”.
5) Always use uppercase letters.
6) Do not erase your guidelines. They should be drawn so light that they are not
distracting to the drawing.
7) Use vertical strokes (not slanted) that have a distinct start and stop emphasized.
8) Vertical strokes are thin and horizontal or rounded strokes are thicker.
9) Purchase a small triangle to use for all vertical strokes.
10) Lettering should consistently be the same height. All notations should be 1/8”
high. All titles should be 3/16” high
11) Round letters should be done in two strokes. Concentrate on the curved line.
Dimensions:
1) Keep extension lines in the light to medium value.
2) Offset the leader/extension lines from the object lines at least 1/16” to 1/8”.
Never touch these lines to the edge of the walls.
3) Use a hierarchical method. The outside is the overall dimension, the middle may be centerlines and the closest in would be the details.
4) Keep the spacing between multiple extension lines at an equal distance.
5) Always write in feet and inches (except for NKBA) 5’-6”. Never 66”.
6) If under 12” you can write in all inches.
7) Horizontal dimensions sit above the lines and read across the sheet from left to
right.
8) Vertical dimension lines should read from the left hand edge and should not
require rotating the plan in all different directions.
9) Exterior walls are dimensioned outside the floor plan.
10) If the dimension is too large to write into a space, write it to the outside and use a leader line to point the dimension to the space.
Misc.
1) Interior walls are typically drawn at 5” thick.
2) Exterior walls are typically drawn at 6-8” thick.
Good drafting skills are essential to any drafting projects and are developed with
practice. The three main skills that you need to develop are 1) reading a scale 2) line quality 3) lettering.
Linework and Line Weights
There are three steps you can take to control the line quality:
1) the pressure you put on the lead holder
2) the sharpness of the lead
3) the type of lead
Light/ Thin Lines
Always start your drawings using light “layout” lines using a hard lead such as 3H. These lines should be very light so that when bluelines or copies are made, they will not show up on the plan. Guidelines for lettering should also be very light. Light lines can be achieved by using a finer point mechanical pencil, such as a .3mm .
Lines that are slightly darker, but still light are extension lines, leaders, door swings and break lines. These will be the thinnest visible lines on your copies.
Medium Lines
Used for hidden objects and are usually indicated with dashed lines. Centerlines are usually medium weight as well as object lines (furniture and equipment). Use a 2H and a .5mm lead.
Thick Lines (Darkest)
Typically twice as thick as a light line, these lines are for major elements such as walls and structural members. Items such as fireplaces and stairways also use thick lines. Use a H hardness with a .5mm thickness.
Drafting Tips:
1) Use variety of leads from 3H – H and from .3 - .5 or .7mm. If you only use one lead harness and thickness, you will have a poorly drafted plan.
2) Start with very light layout lines (2H or 3H) and darken in the plan just before you make copies or blue lines. This will prevent smears all over your drawing.
3) Work from top to bottom so that you are not smearing your tools and hand all
over your drawing. You may want to cover up your drawing with trash paper to
protect it from smears.
4) Invest in a good mechanical pencil that has a long tip for working with the
parallel bars. If the tip is too short, your lines will be wavy. Make sure to keep your pencil tip close to the parallel bar.
5) If you have fuzzy lines, you have bad line quality. Your lead may be too soft or
you may be working on a hard surface. Use a vinyl drafting pad on your surface.
Fuzzy lines are also an indicator that you are not rotating your pencil and the lead is not pointed.
6) Keep your pencil at an angle (30 – 60 degrees) from the drawing surface.
7) Pull the lead across the paper. Don’t push the lead into the paper.
Lettering
1) Always use lettering guidelines and keep them VERY light (3H) and thin.
2) Change out your pencil to H or HB for lettering.
3) Use a scale or Ames lettering guide to create the guidelines. You can use a 2-
part or a 3-part line. The top and bottom lines are the boundaries while the middle line provides a guide for letter parts.
4) Spacing between lines should be 1/16”.
5) Always use uppercase letters.
6) Do not erase your guidelines. They should be drawn so light that they are not
distracting to the drawing.
7) Use vertical strokes (not slanted) that have a distinct start and stop emphasized.
8) Vertical strokes are thin and horizontal or rounded strokes are thicker.
9) Purchase a small triangle to use for all vertical strokes.
10) Lettering should consistently be the same height. All notations should be 1/8”
high. All titles should be 3/16” high
11) Round letters should be done in two strokes. Concentrate on the curved line.
Dimensions:
1) Keep extension lines in the light to medium value.
2) Offset the leader/extension lines from the object lines at least 1/16” to 1/8”.
Never touch these lines to the edge of the walls.
3) Use a hierarchical method. The outside is the overall dimension, the middle may be centerlines and the closest in would be the details.
4) Keep the spacing between multiple extension lines at an equal distance.
5) Always write in feet and inches (except for NKBA) 5’-6”. Never 66”.
6) If under 12” you can write in all inches.
7) Horizontal dimensions sit above the lines and read across the sheet from left to
right.
8) Vertical dimension lines should read from the left hand edge and should not
require rotating the plan in all different directions.
9) Exterior walls are dimensioned outside the floor plan.
10) If the dimension is too large to write into a space, write it to the outside and use a leader line to point the dimension to the space.
Misc.
1) Interior walls are typically drawn at 5” thick.
2) Exterior walls are typically drawn at 6-8” thick.
Subscribe to:
Posts (Atom)


 Posts
Posts


