First, let's again look at the table code illustration used in Chapter 11.
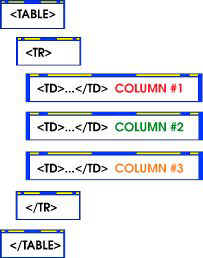
Table Tag
To create a table you must used the following container tag:
<table>...</table>
This let's the browser know that a table is forthcoming.
Row Tag
Each table has at least one row and within that row are columns or what is also referred to as cells. The row tag looks like this:
<tr>...</tr>
See how the row tag wraps around the column (cell) tags? You can have several rows, which will be exploring in this chapter.
Column/Cell tag
And finally, to complete your table you must have the column or cell tag--this is where you information and images go. The column/cell tag looks like this:
<td>...</td>
Notice that I keep on using the words column and cell together. That's because in HTML tables, these words are often used to mean the same thing. It can be confusing at times.
Maybe an illustration can help. Here is a table with lots of rows and cells (columns).
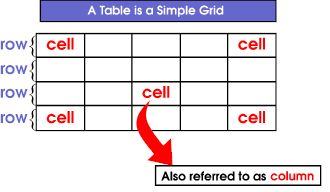
A table with multiple rows and columns/cells
Now that we've gone through the table tags and have a beginning understanding of rows and columns, let's create a table with several rows and a couple of columns each.
Step 1 Open up your text editor.
Step 2 Enter the following code.
<html>
<head>
<title> Rows </title>
</head>
<body>
<h1>Here's a table with two rows</h1>
<table border="1">
<tr>
<td>This is column one</td>
<td>This is column two</td>
</tr>
<tr>
<td>This is column A</td>
<td>This is column B</td>
</tr>
</table>
</body>
</html>
Step 3 Save the file as rows.html
Step 4 Open Netscape Navigator
Step 5 View the page in the browser.
If all went right, you now have two rows and two columns/cells. Now let's examine the column/cell tag.
Column/cell tag and its attributes
In Chapter 11, we learned about a couple of attributes--bgcolor and width. You can use these in the table tag (<table>), and the column/cell tag (<td>). You can also use other attributes in the column/cell tag, such as:
- align: sets your text or image to left, center or right
- valign: sets your content vertically to top, center or bottom
- colspan: expands across multiple columns/cells
- rowspan: expands over multiple rows
Align attribute
Leaving your text or image to the left of your column is usually pretty boring, so the align attribute lets you center things, using "center" or place them to the right, using "right".
Valign attribute
When placing copy in a column, the browser will automatically place it in the center of the column. You can change this default by using the valign attributes of "top", "center" or "bottom".
Let's apply these two attributes now before we continue.
Step 1 Open up your text editor.
Step 2 Enter the following code.
<html>
<head>
<title> Alignment Attributes </title>
</head>
<body>
<h1>Here are some examples of alignment</h1>
<table border="1" width="100%">
<tr>
<td bgcolor="#ff0000" width="40%" align="right">
This is column one<br>
This is column one<br>
This is column one<br>
This is column one<br>
</td>
<td width="60%">
This is column two<br>
This is column two<br>
This is column two<br>
This is column two<br>
</td>
</tr>
<tr>
<td bgcolor="#ffff00" width="40%" align="center">
This is column A<br>
This is column A<br>
This is column A<br>
This is column A<br>
This is column A<br>
This is column A<br>
</td>
<td bgcolor="#0000ff" width="60" valign="bottom">
<font color="#FFFFFF">
This is column b<br>
This is column b<br>
This is column b<br>
</font>
</td>
</tr>
</table>
</body>
Step 3 Save the file as alignment.html
Step 4 Open Netscape Navigator
Step 5 View the page in the browser.
If all went well, you should have a very colorful table with two rows and four columns (cells). Now we are ready to explore expanding these rows and columns (cells) in order to add interest to a page.
Spanning rows and columns
Ever wonder how some pages have such wonderful layouts? They're using tables. To see what I mean, take a look at these links:
Even though some of these Web sites are using some advanced things like frames and java script (coming soon!), each one uses tables as their basic structure. Learning to span rows and columns can help you add variety to your tables too!
To begin, let's look at our previous illustration, but this time with some rows and columns expanded.
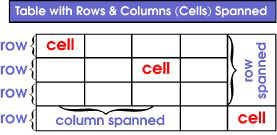
- colspan: expands across a number of columns
- rowspan: expands across a number of rows
Step 1 Open up your text editor.
Step 2 Enter the following code.
<html>
<head>
<title> Rowspan and Colspan </title>
</head>
<body>
<h1>Here's a table demonstrating rowspan and colspan</h1>
<table border="1">
<tr>
<td rowspan="2">This is an example of rowspan. It is spanning two rows.</td>
<td>This is column B</td>
<td>This is column C</td>
</tr>
<tr>
<td>This is column D</td>
<td>This is column E</td>
</tr>
<tr>
<td colspan="3">This is an example of colspan. It is spanning three columns.</td>
</tr>
</table>
</body>
</html>
Step 3 Save the file as span.html
Step 4 Open Netscape Navigator
Step 5 View the page in the browser.
Download in PDF Format HERE:
 Learning HTML


No comments:
Post a Comment