Some details.
It wasn’t always so colorful and so easy to place images onto a Web page. From the start, images have always been memory and space hogs. But during the past few years, designers have worked hard to keep image files small, while also increasing the quality of the artwork that appears on the Web today.
Two file formats have been developed to help keep files small, while maintain a high level of quality:
.gif files: graphic interchange format (pronounced like Jif peanut butter)
.jpg files: joint photographic experts group (pronounced jay-peg)
There are some advantages particular to both. The gif format is the oldest, created by CompuServe to provide a way to show graphics no matter what computer you are using (it’s called cross-platform). Later, the "gif89" format was created so that the image background becomes transparent. That’s a good thing when working with colored page backgrounds. The gif format is also better for line art.
On the other hand, the jpg format was originally created to store photographs. Files formatted in jpg are larger than those in gif, and they do not have transparent backgrounds.
If you have images that are not in one of these two formats, you will need an image editor to convert them. Two such programs are Adobe® PhotoShop or Paint Shop Pro (a shareware program that you can download at Jasc Software).
The Image tag
To place an image onto a Web page you will need to use the image tag. There are two very important things to remember about the image tag:
- It’s an empty tag (remember, that means there’s no closing tag, only a beginning).
- It requires attributes to be effective.
The image tag <img> has several attributes:
src--identifies the image and tells the browser where to get the image
alt—gives alternative text for those who are not viewing their pages as images.
height & width—tells the browser the size of the graphic (speeds up the downloading process
Let’s go through each one of the attributes in more detail.
SRC attribute
To help the browser identify and find an image, you use the following command:
<img src="filename.gif">
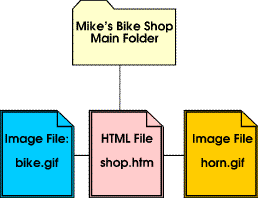
I’d like to cover a couple of important things here. While the name of the file is important, it is equally important to direct the browsers to where the file is located. The browser will not show your image if it can’t find it.Let’s see if I can demonstrate this process through the following diagram.

Alt attribute
Sometimes people turn off their image loading option in their browser, leaving a Web page with lots of blank boxes. So all the work you have done to place those important images is gone, leaving in its wake only blank, boring boxes.
The alt attribute lets the user know what’s in the picture by providing descriptive text. It also has an added feature with the latest versions of Internet Explorer and Netscape Navigator. When the cursor arrow passes over artwork or a photo, a little rectangular box pops up that contains the alt copy. It’s a great way to add interest to your page or even give instructions to the user.
Here’s an example. Place your arrow (cursor) over the image below. If you have the latest version of IE or Navigator, you will see a pop-up box that says, "When things go wrong with your code, you need to do some detective work!"

<img src="mystery.jpg" alt="When things go wrong with your code, you need to do some detective work!">
Height & Width attribute
When placing your images onto the screen, the browser looks for the height and width of your images. This is an excellent feature because it allows the browsers to set the space size aside while laying out the balance of the page. If you do not specify the size, the browser will stretch it or reduce it to fit.
Height and width are listed in pixels--those little dots that make up an image on a computer screen. If you want to know the size of your image, open it up in Netscape Navigator. The pixel size appears in the title bar. Here's an example using the following image that measures out at 149 pixels by 140 pixels.

<img src="masks.jpg" width="149" height="140" alt="You can determine how large your images are by opening them in Navigator.">
Align Attribute
When you place a graphic on a page it will always appear to the left (that's the default or the standard for the browser). However, you can place it to the right just by adding the align attribute to the image tag. Here's an example of a right alignment:

And the code looks like this:
<img src="masks.jpg" align="right" width="149" height="140" alt="This is an example of a right-aligned image.">
Centering an image
But what if you want to center an image. The best way is to use the paragraph tag with the center attribute. Here's an example:

<p align="center"><img src="masks.jpg" align="center" width="149" height="140" alt="This is an example of a centered image."></p>
Image Hotspots
Instead of using text as a link (hotspot), it's very common to use an image. It's simple too! Just take include the image tag within the anchor tag.
Here's the code for a link to the Blast-Off page:
<a href-"graphicsc10.html"><img src=atom.jpg width="119" height="120" alt="Take this link to the Blast-Off page" border="0"></a>
And here's the image hotspot. Place your cursor over it and then click.
Notice that there is an extra attribute: border. And I've given it a value of "0". You must add the border attribute if you do not want a border. If you do not list a border, the browser will go to the default, which looks like this:
You can use an image to serve as an internal link within your own Web site. Another way is to use image maps. To learn more about image maps, go to HTML Goodies.
Download in PDF Format HERE:
 Learning HTML


No comments:
Post a Comment